merge_and_cut
This pipeline is an example of a double-nested input file array (e.g. [[[f1, f2], [f3, f4]], [[f5, f6], [f7, f8]]]).
It consists of a subworkflow called merge (previous section) and an extra step called cut. Merge consists of two steps, paste and cat, the former pastes input files horrizontally and the latter concatenates input files vertically. Cut prints the first letter of every line from a list of files. Since we’re using generic commands, we do not need to create a pipeline software component or a Docker image. We will use the existing ubuntu:20.04 Docker image. So, we will just do the following three steps.
- create the pipeline description using either CWL or WDL.
- prepare for a job definition that specifies pipeline, input files, parameters, resources, output target, etc.
- run Tibanna.
Data
For input data, let’s use files named smallfile1, smallfile2, … smallfile8 in a public bucket named my-tibanna-test-input-bucket. Each of these files contains a letter (’a’, ‘b’, … , ‘h’, respectively). We feed an array of array of array of these files in the following format:
[
  [[smallfile1, smallfile2], [smallfile3, smallfile4]],
  [[smallfile5, smallfile6], [smallfile7, smallfile8]]
]
(You could also upload your own file to your own bucket and set up Tibanna to access that bucket.)
Pipeline description
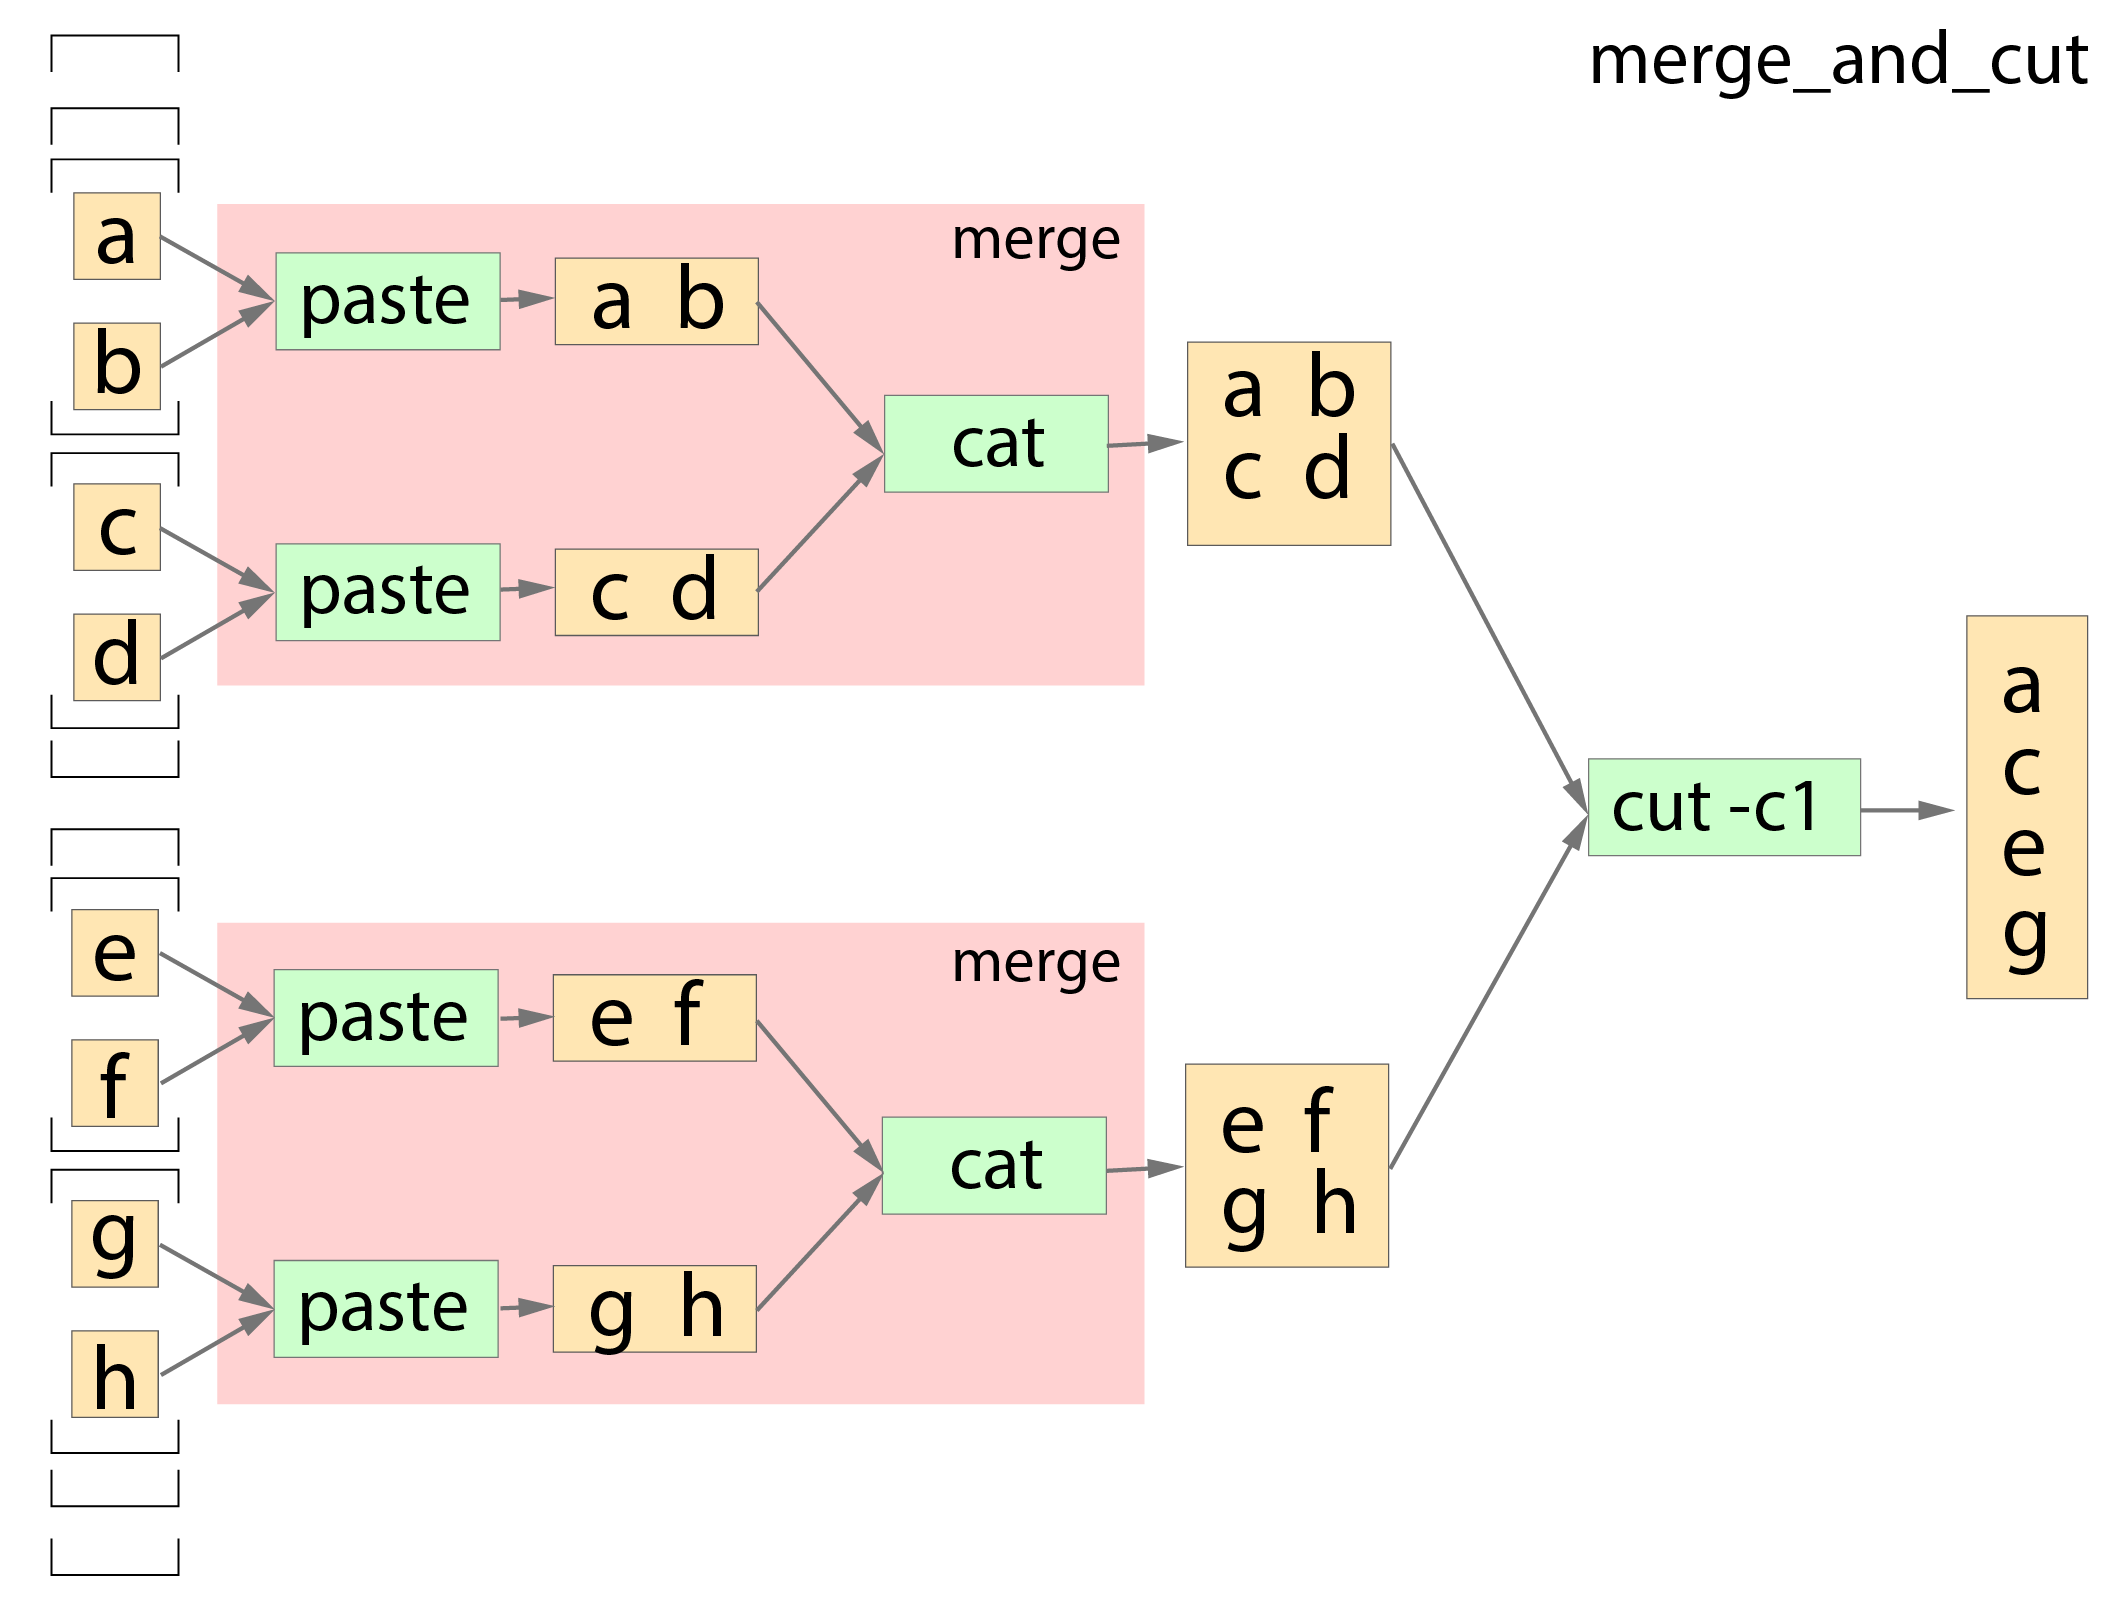
Thie pipeline takes an input ‘smallfiles’ which is an array of array of array of files. The 3D input is scattered into 2D arrays to the first subworkflow merge, which internally scatters each of the 2D arrays into 1D at the step paste and put it through another step cat which produces a single file. Therefore, each 2D array has an output of a single file. The result of these outputs are combined into an array and fed to the extra step cut.
CWL
The structure of this pipeline is a bit complex and we use five CWL files, three of which are identical to the ones from
mergeworkflow example (merge.cwl,paste.cwl,cat.cwl) since we’re using themergeworkflow as a subworkflow. There is one master CWL (merge_and_cut.cwl) and an extra step CWL,cut.cwl.These CWL files can be found at the following URLs:
- https://raw.githubusercontent.com/4dn-dcic/tibanna/master/examples/merge_and_cut/merge_and_cut.cwl
- https://raw.githubusercontent.com/4dn-dcic/tibanna/master/examples/merge_and_cut/merge.cwl
- https://raw.githubusercontent.com/4dn-dcic/tibanna/master/examples/merge_and_cut/paste.cwl
- https://raw.githubusercontent.com/4dn-dcic/tibanna/master/examples/merge_and_cut/cat.cwl
- https://raw.githubusercontent.com/4dn-dcic/tibanna/master/examples/merge_and_cut/cut.cwl
To use your own CWL file, you’ll need to make sure it is accessible via HTTP so Tibanna can download it with
wget: If you’re using github, you could use raw.githubusercontent.com like the link above.The following is
merge_and_cut.cwl.--- class: Workflow cwlVersion: v1.0 inputs: smallfiles: type: type: array items: type: array items: type: array items: File outputs: - id: "#merged_and_cut" type: File outputSource: "#cut/cut1" steps: - id: "#merge" run: "merge.cwl" in: - id: "#merge/smallfiles" source: "smallfiles" scatter: "#merge/smallfiles" out: - id: "#merge/merged" - id: "#cut" run: "cut.cwl" in: - id: "#cut/files" source: "#merge/merged" out: - id: "#cut/cut1" requirements: - class: "ScatterFeatureRequirement" - class: "SubworkflowFeatureRequirement"The pipeline is ready!
WDL
WDL describes this pipeline in two files, one main file and a subworkflow file. The main file can be found at https://raw.githubusercontent.com/4dn-dcic/tibanna/master/examples/merge_and_cut/merge_and_cut.wdl and the subworkflow file is identical to the WDL file used in the example of merge (https://raw.githubusercontent.com/4dn-dcic/tibanna/master/examples/merge_and_cut/merge.wdl). To use your own WDL file, you’ll need to make sure it is accessible via HTTP so Tibanna can download it with
wget: If you’re using github, you could use raw.githubusercontent.com like the link above. Content-wise, this WDL does exactly the same as the above CWL. Below is the main WDL.import "merge.wdl" as sub workflow merge_and_cut { Array[Array[Array[File]]] smallfiles = [] scatter(smallfiles_ in smallfiles) { call sub.merge {input: smallfiles = smallfiles_} } call cut {input: files = merge.merged} output { File merged_and_cut = cut.cut1 } } task cut { Array[File] files = [] command { cut -c1 ${sep=" " files} > cut1 } output { File cut1 = "cut1" } runtime { docker: "ubuntu:20.04" } }
The pipeline is ready!
Job description
To run the pipeline on a specific input file using Tibanna, we need to create an job description file for each execution (or a dictionary object if you’re using Tibanna as a python module).
Job description for CWL
The example job description for CWL is shown below and it can also be found at https://raw.githubusercontent.com/4dn-dcic/tibanna/master/examples/merge_and_cut/merge_and_cut_cwl_input.json.
{
  "args": {
    "app_name": "merge_and_cut",
    "app_version": "",
    "cwl_directory_url": "https://raw.githubusercontent.com/4dn-dcic/tibanna/master/examples/merge_and_cut",
    "cwl_main_filename": "merge_and_cut.cwl",
    "cwl_child_filenames": ["merge.cwl", "paste.cwl", "cat.cwl", "cut.cwl"],
    "cwl_version": "v1",
    "input_files": {
      "smallfiles": {
        "bucket_name": "my-tibanna-test-input-bucket",
        "object_key": [
            [["smallfile1", "smallfile2"], ["smallfile3", "smallfile4"]],
            [["smallfile5", "smallfile6"], ["smallfile7", "smallfile8"]]
        ]
      }
    },
    "secondary_files": {},
    "input_parameters": {},
    "output_S3_bucket": "my-tibanna-test-bucket",
    "output_target": {
      "merged_and_cut": "some_sub_dirname/my_first_merged_and_cut_file"
    },
    "secondary_output_target": {}
  },
  "config": {
    "ebs_size": 10,
    "EBS_optimized": true,
    "instance_type": "t3.micro",
    "password": "whateverpasswordworks",
    "log_bucket": "my-tibanna-test-bucket"
  }
}
The json file specifies the input double-nested file array (“smallfiles”), matching the name in CWL. The output file will be renamed to
some_sub_dirname/my_first_merged_and_cut_filein a bucket namedmy-tibanna-test-bucket. In the input json, we specify the CWL file withcwl_main_filenameand its url withcwl_directory_url. Note that the file name itself is not included in the url). Note that child CWL files are also specified in this case ("cwl_child_filenames": ["merge.cwl", "paste.cwl", "cat.cwl", "cut.cwl"]).We also specified in
config, that we need 10GB space total (ebs_size) and we’re going to run an EC2 instance (VM) of typet3.microwhich comes with 1 CPU and 1GB memory.
Job description for WDL
The example job description for WDL is shown below and it can also be found at https://raw.githubusercontent.com/4dn-dcic/tibanna/master/examples/merge_and_cut/merge_and_cut_wdl_input.json.
Content-wise, it is exactly the same as the one for CWL above. Notice that the only difference is that 1) you specify fields “wdl_main_filename”, “wdl_child_filenames” and “wdl_directory_url” instead of “cwl_main_filename”, “cwl_child_filenames”, “cwl_directory_url”, and “cwl_version” in
args, that 2) you have to specify"language" : "wdl"inargsand that 3) when you refer to an input or an output, CWL allows you to use a global name (e.g.smallfiles,merged), whereas with WDL, you have to specify the workflow name (e.g.merge_and_cut.smallfiles,merge_and_cut.merged_and_cut). We omit the step names in this case because we use global variables that are passed to and from the steps.{ "args": { "app_name": "merge_and_cut", "app_version": "", "language": "wdl", "wdl_directory_url": "https://raw.githubusercontent.com/4dn-dcic/tibanna/master/examples/merge_and_cut", "wdl_main_filename": "merge_and_cut.wdl", "wdl_child_filenames": ["merge.wdl"], "input_files": { "merge_and_cut.smallfiles": { "bucket_name": "my-tibanna-test-input-bucket", "object_key": [ [["smallfile1", "smallfile2"], ["smallfile3", "smallfile4"]], [["smallfile5", "smallfile6"], ["smallfile7", "smallfile8"]] ] } }, "secondary_files": {}, "input_parameters": {}, "output_S3_bucket": "my-tibanna-test-bucket", "output_target": { "merge_and_cut.merged_and_cut": "some_sub_dirname/my_first_merged_and_cut_file" }, "secondary_output_target": {} }, "config": { "ebs_size": 10, "EBS_optimized": true, "instance_type": "t3.micro", "password": "whateverpasswordworks", "log_bucket": "my-tibanna-test-bucket" } }
Tibanna run
To run Tibanna,
- Sign up for AWS
- Install and configure
awscli
- Install Tibanna on your local machine
see Installation
- Deploy Tibanna (link it to the AWS account)
see Installation
Run workflow as below.
For CWL,
cd tibanna
tibanna run_workflow --input-json=examples/merge_and_cut/merge_and_cut_cwl_input.json
or for WDL,
cd tibanna
tibanna run_workflow --input-json=examples/merge_and_cut/merge_and_cut_wdl_input.json
Check status
tibanna stat